A filter brings many substantial benefits to the aquarium as it generally helps clean the water for the fish to live. There are different types of filters, but one type that stands out because of its simplicity and affordability is undergravel filter.
So, how does an undergravel filter work? This article will show you the real process when an undergravel filter works in the fish tank. We will also show how to set up this type of filter in the aquarium.
Contents
Undergravel Filter: How it work
Undergravel filters are an excellent innovation when it comes to aquarium filters. This type of filter is affordable but still comes with a lot of reliability and effectiveness. There is no doubt that the undergravel filter is one of the most popular aquarium filters up to this day.
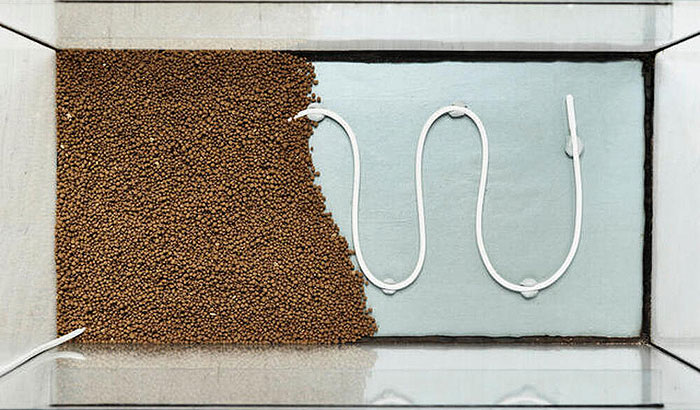
The principle behind an undergravel filter is straightforward. It involves a plastic plate that will cover the whole bottom of the aquarium. This plastic will vary in shape depending on brands, but the entire principle is still the same.
This plastic plate will then be covered by aquarium gravel. The gravel will serve as the substrate and function as the primary filtration method. Also, at the back corner of each plastic plate is a lift tube that is connected from the plate to the top of the aquarium.
This loft tube is where the water will be drawn up along with the bubbles using either an air stone or a small motor. This action will then pull the aquarium water under the plastic plate while drawing the water down to the gravel.
Meanwhile, when the aquarium water passes to the substrate, which is the gravel, all the nitrifying bacteria living in the substrate will use the oxygen found in the water to break down the ammonia and nitrite.
The total surface area of the substrate will provide enough space for the bacteria to colonize. At the same time, the constant movement of the water will make sure that there is enough oxygen to support the bacteria colony.
Also Serve as Mechanical Filter
With the way it works, the undergravel filter can also function as a mechanical filter. It has the capacity to catch solid particles once they pass to the substrate. Unfortunately, it can lead to the accumulation of these particles, which can reduce the space in the substrate and eventually affect the quality of the filtration process.
However, using a mechanical filter for your aquarium will effectively negate this problem. It will remove any particles found in the substrate. You can also do constant cleaning in the gravel to eliminate all the solid particles found in the gravel.
For this filter to work consistently, it is a must to clean it regularly. Having a maintenance schedule will help prevent buildup that may reduce the filter’s effectiveness. With proper care and regular cleaning, it will help keep it effective all the time.
How to Set up an Undergravel Aquarium Filter

Setting up an underground filter is not that difficult. The key is to follow the instructions provided by the company to make the installation process more manageable. But in general, please check the step-by-step guide below in installing an undergravel filter.
Step 1: Looking for the Right Air Pump
The initial step is to determine the right type of pump that will be used in the aquarium. It will all depend on the size of your fish tank. It is recommended to use a 90 liter air pump for every 50 liters of aquarium capacity.
Step 2: Filtration Base Assembly
Decide on how many filtration bases you need before fitting it together. It will all depend on the size of your aquarium. Then, you can now slide the downpipe into the right place. Most of the downpipes are usually extendable, but the adjustment will all depend on the aquarium’s height.
Step 3: Air Pump Connection
Connect the air pump to the airline and the air stone through the hole on top of the outlet piece. Insert the air stone and the airline to your downpipe but make sure not to attach the outlet piece just yet. This assembly will be your underground filter system.
Step 4: Filtration Base Installation
Get the underground filter and position it slowly in the aquarium. Please note that if you are planning to have rocks or ornaments in the aquarium, you can put them on the side of the underground filter system and not on top of it.
Then, you can now cover the filter system with gravel but make sure it will not be more than an inch. Also, make sure that all the sand and gravel are cleaned and rinsed before putting it in the aquarium.
Step 5: Filling the Aquarium with Water
After everything is ready, you can now put water into the aquarium. Please note that the downpipe should fill with water as fill the aquarium to make sure it is not blocked. You can test it by adding water to it. It is probably blocked if it overflows and does not fill up the aquarium.
Then, carefully attach the outlet piece but make sure that the downpipe is submerged at least as far as the white end cap. You can now initialize the air pump when everything is already secured and ready.
The bubbles produced in the downpipe will effectively create suction, pulling water through the gravel, up the pipe and back into the aquarium. This process will effectively turn the aquarium gravel into a biological filter.
Conclusion
Learning how an undergravel filter works will make you understand how simple the process is with this filtration system. It is not surprising that this filtration system is still popular, although many advanced aquarium owners think it is obsolete. However, the effectiveness and affordability of this type of filter will still be helpful to any aquarium.