The easiest way to provide your planted aquarium with CO2 gas (a vital fertilizer) is to make your own yeast powered CO2 generator. This can be done very easily and inexpensively (all you need to buy is tubing and the supplies for the yeast recipe). Below are the tools and supplies required:
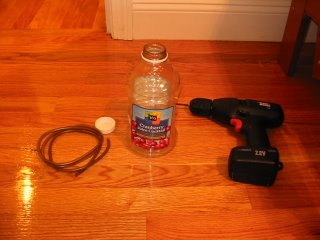
Any juice container will work, or any container with a tight fitting lid for that matter. However, some containers work better than others. I’ve always had good results with juice containers whereas some of the othe containers I’ve tried (like the big iced tea jugs) don’t make an airtight seal when closed. You can use any size, however 48-64 ounce containers are a good size. They fit the 2 cups sugar called for in most recipes and don’t take up a huge amount of space. The bigger the generator, the more water there is which dilutes the alcohol byproduct that eventually kills the yeast, so larger containers will last longer as long as you add the same amount of ingredients. The tubing can be any kind of airline tubing, however standard airline tubing will eventually go hard and crack from exposure to CO2. Using silicone or CO2 resistant tubing is best. A drill is nice, but if you don’t have one, the same result can be acheived with a nail or screw.

Step 1
Drill a hole in the lid smaller than the diameter of the tubing, but large enough so you think you’ll be able to squeeze it through. I use a smaller drill bit and then widen the hole with a pair of aquarium tweezers. Remember you can only make the hole larger, so don’t get overzealous.
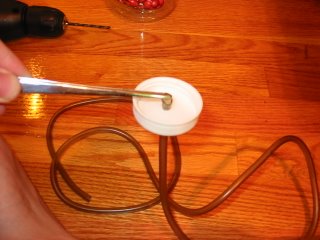
Step 2
Cut the end of the tubing on a diagonal and push it through the hole in the lid as shown, using tweezers or pliers to grab it on the other side and pull it through. If it doesn’t seem to fit, make your hole bigger. If you don’t need pliers or tweezers, the hole is too big and CO2 will leak out. If this happens, you need a new container (or at least a new lid). Pull it through only a half an inch or less.

Step 3
This is the finished cap and tubing. The seal should be tight enough to prevent leakage. There is no need for glue or silicone if it is done right. Just screw the lid on and you’re ready to mix up your yeast solution!
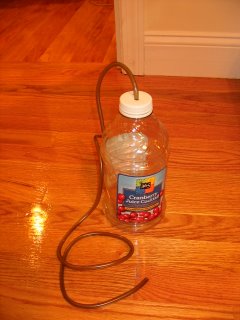
The Final Product: A DIY Yeast Generator
There are a few important things to remember about DIY yeast generators.
- First, they are under pressure. Although it is highly unlikely they will burst, it does happen if the tubing gets clogged. Make sure the gas has a clear path to your tank. Some people add a check-valve between the tank and the generator to prevent yeast bubbles and goo from going up the tubing. Personally I’ve never had this happen and adding a check valve only makes another possible leakage point. As long as you don’t overfill or shake up your mixture, it shouldn’t get into the tubing.
- Also remember that if you squeeze the bottle (even gently), once you release it, it will suck up aquarium water. This can form a siphon and once it does, aquarium water will flood your generator. This will ruin the reaction (other bacteria and organisms in the water will out-compete the yeast) and can make a big mess. So be careful and set the generator down before screwing on the lid and connecting it to the tank.
- Finally, a DIY yeast generator is a rather low powered CO2 generator, so diffusing all that CO2 most effectively and stopping leaks is paramount. One leak can make the whole thing not work. A cheap idea for diffusing the CO2 in the tank (called a reactor) is to put the tubing from the generator into the input of a powerhead or canister filter. The impeller will suck up and pulverize the CO2 bubbles, creating a fine mist that will dissolve much faster. Look for an article soon on the different type of CO2 reactors!