Contents
How to Seal a Fish Tank
A leaking fish tank can be an issue during your fishkeeping journey. However, as an aquarist, learning how to seal a fish tank is extremely important for providing an immediate solution to the movement your fish tank is leaking. This article will teach you how to reseal a fish tank quickly and efficiently.
What to Prepare:
- Silicone Sealant (Must be Waterproof and Fish-safe)
- Straight Razor (will be used to remove the old sealant)
- Acetone
- Extra Containers (To hold the fish while the fish tank is resealed)
- Old cloth for cleaning
Step 1: Fish Tank Preparation
The initial step is to prepare the fish tank before the resealing process. You will need to remove all the fish, substrate, gravel, decorations, filters, and other things found in your fish tank. For the fish, you will need to transfer them to a safe container that will temporarily house them.
Once everything is removed, you can start draining the water to make it easy for you during the resealing process. Preparation also means cleaning everything in the tank to remove all the dirt before it is resealed.
Step 2: Removing the Sealant
After cleaning the fish tank, you will need to dry it first before going to the next step. You can wipe it with a piece of cloth to make the drying faster or have it exposed to the sunlight for it to completely dry.
Once it is dry, the next step is to remove the old sealant from the aquarium. Use a straight razor to do this job. Make sure that everything is removed and free from the old sealant. Make sure that the razor you are using is sharp enough to do this job with ease.
Once the old sealant is removed, finish the job by cleaning the joint with acetone. This step will totally remove the old sealant from the fish tank. This step is essential to ensure a solid seal during the resealing process.
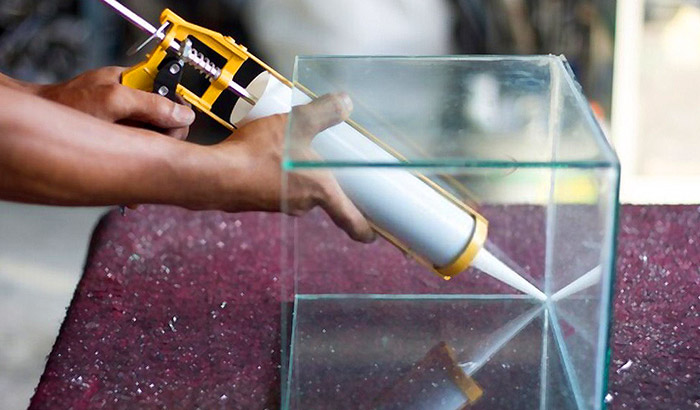
Step 3: Aquarium Sealant Application
The next step is to apply the aquarium sealant to the fish tank. You can start by applying about ¼ of an inch bead to the outside of the joint. Then, you can proceed with applying the sealant to the interior of the fish tank using the same process.
You will need to make sure that every glass wall is separated with a silicone bead during this step. Make sure that there will be no air bubbles that are trapped in the seal. You can also apply it to the inner bead to prevent the sealant from being loose due to intense water pressure.
This so-called interior bead will also help reinforce the strength of the sealant to make it stronger. Once everything is done, you can now proceed with applying the sealant to the other joints using a similar process.
Step 4: Allow the Sealant to Cure

After resealing all the joints, it is a must to allow the sealant to cure to maximize the result of the resealing process. Always remember that an aquarium sealant must be kept from getting wet before it cures.
It can take time for the sealant to cure and achieve the maximum result. In fact, the average time for an aquarium sealant to completely cure should be between 24 to 48 hours. After that, you can now expose the fish tank to water.
Step 5: Refilling of Water
Once the sealant is fully cured, you can now start refilling your aquarium with water. During the refilling process, it is best to refill the tank three inches at a time. This step is to make sure that the seam is secure.
Once the fish tank is refilled, you may now proceed with putting the fish and the other stuff in the aquarium following the same procedure. Kindly check for any issues with your joints, such as any slight leakage.
How to Seal a Fish Tank with Water in it
Is it possible to seal a fish tank with water still in it? Yes, it is possible. When the leakage problem is not that big, and the leakage spot is located in the upper portion of the aquarium, then it can be done.
All you have to do is remove some water until you will have easy access to where the leakage happens. It is very important that you have enough space to work on the leakage spot. Thus, reducing the water level is essential.
Then, you can now proceed to reseal the leakage spot using the similar process we presented above. The only difference is that there is no need to remove all the water in the tank since it is only a small leakage issue.
Conclusion
Learning how to seal a fish tank is an excellent knowledge to have if you are an aquarium owner. It will give you a suitable skill that will allow you to address any leakage issue that will happen in your fish tank.